Chewy Tahini Chocolate Chip Cookies (Gluten-Free & Grain-Free)

Chewy Tahini Chocolate Chip Cookies (Gluten-Free & Grain-Free)

If you make any cookie from this blog, let it be this one. I might regret saying that later, but it's how I feel now and what's a blog if not in-the-moment. 

While I've used a lot of nut and seed butters in baking before, tahini is something special in a cookie. 

Chewy Tahini Chocolate Chip Cookies (Gluten-Free & Grain-Free)

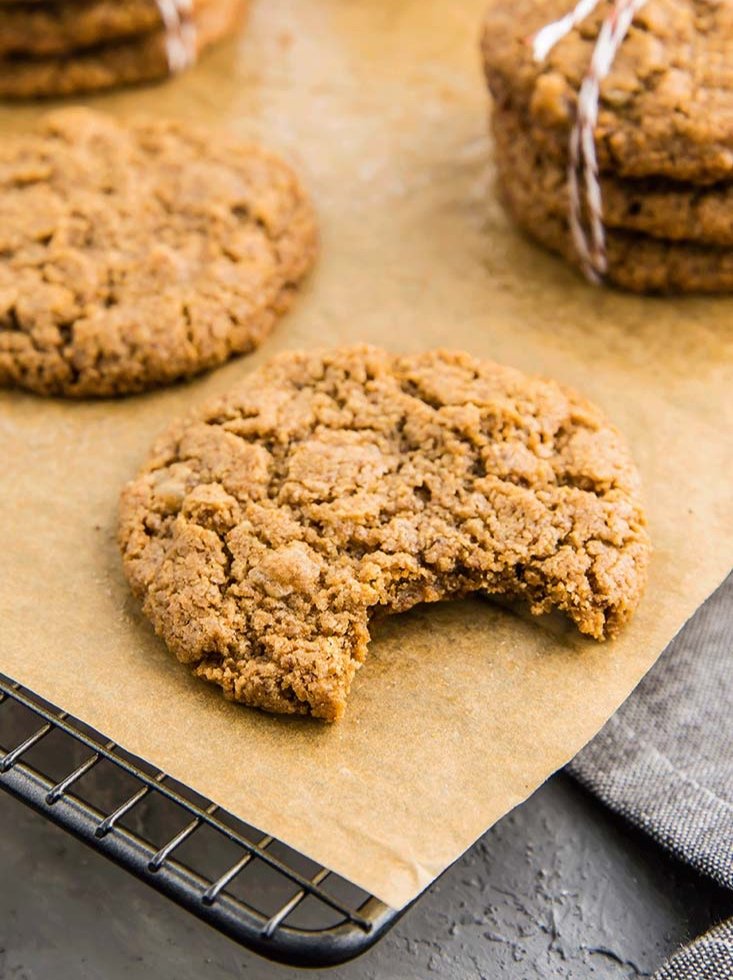
First let me say that I love thin, chewy, fresh-out-of-the-oven-soft cookies. Gooey. Warm. Indulgence. That what makes tahini ideal: its consistency and fat content allows it to spread out into a thin cookie, and even as the cookies cool they never get crispy. They maintain that soft, chewy bite for days. 

Coconut sugar is also necessary here -- it's not something I usually use, opting for maple syrup or honey in most of my baking - but a crystalized sugar helps to glue the cookies together, so that everything doesn't just fall apart when you pick them up. So you can dip your cookie in a shot of espresso, or a glass of milk or cup of tea. 

Chewy Tahini Chocolate Chip Cookies (Gluten-Free & Grain-Free)

Chewy Tahini Chocolate Chip Cookies

Published May 17, 2018 by

Serves: 20   |    Total Time: 30 minutes


Ingredients:

  • 1 cup coconut sugar
  • 1/4 teaspoon baking soda
  • 1/4 teaspoon salt 
  • 1 cup tahini (stirred well)
  • 1 tablespoon vanilla 
  • 1 egg
  • 1/2 cup chopped dark chocolate bar (about 2 ounces)

Directions:

  1. Preheat oven to 350°F.
  2. In a medium sized mixing bowl, combine coconut sugar, baking soda, and salt. Whisk briefly.
  3. Add tahini, vanilla, and egg to bowl, and use a spatula to stir until a stiff, sticky batter forms. Fold in chopped chocolate.
  4. Optional: place bowl of batter in the fridge for 10 minutes to allow dough to stiffen a bit more.
  5. Using your hands, roll dough into spheres by the heaping tablespoonful. Place spheres 2 inches apart of a baking sheet lined with parchment paper, and flatted slightly with your fingers.
  6. Bake for 10-12 minutes, until cookies have spread and are golden. Cookies will still be quite soft when you remove them from the oven. Allow them to cool at least 10 minutes before attempting to move them to a cooling wrack or a plate.

4 Comments

Power Cookies

Power Cookies

Last night, the snow fell as over-sized flakes and we tried to catch them on our tongues, like we were 5 years old. Just two days ago, I was in a tank top looking for a mountain bike trail. This is Colorado springtime.

These Power Cookies enjoy all sorts of outings and fare well through all sorts of weather: throw them in your day bag for a hike, or munch on them while riding the ski lift. They are jam-packed with ingredients to give you energy. Peanut butter, oats, chocolate chips (how could I not include chocolate chips?) pecans, and coconut.

Why is it called a “Power Cookie?”

This cookie recipe sits somewhere between granola bar and cookie. But if you've ever made granola bars you know that they call for a lot (a lot a lot) of sugar in the form of honey, maple syrup, or (usually) rice syrup. That syrup is all there is to hold everything together. And don't get me wrong -- it's delicious! And there are some genius recipes that don’t call for quite as much sugar. But many have so much sugar, they are far too sweet for me. THESE cookies get the help of an egg, peanut butter and some almond meal, which helps them stick together without half as much syrup. YES: more whole foods, less processed syrup. So, it’s a power-bar slash cookie, making the final results a Power Cookie.

Power Cookies

These Power Cookies are really inspired by my dad, who was the first person I knew to make a "energy cookie." He had a recipe similar to this on top of his fridge, in an over-stuffed manila folder. When I started baking a lot on my own (some time in high school), Power Cookies were one of the things I would make. This recipe is different -- the original is lost to me - but similar enough to be given the name "Power Cookies." 

Hope you enjoy, whether you take them on an adventure or eat them right here at your computer, while they're still warm! (They are good either way — you do not need to be out and about to enjoy these. They make a GREAT mid-afternoon power up when you start feeling that 3pm slump, and since they are not so syrup-heavy, they keep you going longer, with real nutrients).

Power Cookies

Power Cookies

Published March 27, 2018 by

Serves: 24 cookies   |    Total Time: 20 minutes


Ingredients:

  • 1/2 cup nut butter (try peanut butter, almond butter, or cashew butter)
  • 1/4 cup honey 
  • 1/4 cup melted butter
  • 2 eggs 
  • 1 teaspoon vanilla extract
  • 1 teaspoon cinnamon (optional - the cinnamon flavor comes through, so if you do not like cinnamon, skip it!) 
  • 1/2 teaspoon baking powder 
  • 1/2 teaspoon baking soda
  • 1/4 teaspoon salt 
  • 1 cup rolled oats 
  • 1 cup shredded, unsweetened coconut
  • 1/2 cup almond flour
  • 1/2 cup pecan pieces
  • 1/2 cup chocolate chips 

Directions:

  1. Preheat oven to 350°F.
  2. In a large mixing bowl, cream together the nut butter, honey, butter, eggs, and vanilla using an electric mixer until smooth.
  3. Add optional cinnamon, baking powder, baking soda, and salt to the bowl, and beat into wet ingredients until incorporated.
  4. Now, add the rolled oats, coconut, almond flour, and mix until a stiff batter forms. Use a spatula to scrape the sides of the bowl as needed. Fold the chocolate chips and pecans into the batter.
  5. Scoop the batter by the heaping tablespoonful onto a cookie sheet fitted with parchment. Cookies will not spread as they bake, so flatten them slightly with the back of a spoon.
  6. Place in center wrack of oven and bake for 8-12 minutes. Cookies will be golden on the edges, but still soft—they will continue to set as they cool. Allow to cool 5-10 minutes before serving.

2 Comments

Raw Gingerbread Energy Bites

Raw Gingerbread Energy Bites

When I first started thinking about all of the holiday goodies in the world and which ones I wanted to make (and share) this season, I jumped to gingerbread pretty much from the start. Even though I already have this recipe for grain-free gingerbread men on the site, I wanted to share another recipe because the cozy combination of spices is just quintessential wintertime for me. 

What I hadn't thought through yet, was how many sweets come with the holiday season, and how every year I wish for those classic holiday flavors in a healthier form. It was right around the time that I began researching for a chewy gingerbread cookie that my friends over at Made in Nature asked me if I would help them with some holiday recipes. Ding! It was as if the stars had aligned and everything came together. Of course. Why not make a chewy gingerbread bite using dates? 

I went to the Made In Nature test kitchen this morning... The end result is delicious.

Raw Gingerbread Energy Bites

These raw gingerbread cookies are something I would take climbing or skiing, but I also just grab one out of the fridge when I need a little something sweet. Heck, I'd even take a batch to a holiday cookie swamp-- it's always so nice to have something a little healthier in the mix. 

Made in Nature provided me with product and compensation for this blog post, but the recipes and opinions are all my own. Working with brands to develop wholesome recipes is one way I keep Foraged Dish going! Made In Nature helps me stock the pantry and keep the blog going. I only work with brands that I truly enjoy and use.  

Raw Gingerbread Energy Bites

Raw Gingerbread Energy Bites

Published December 15, 2016 by

Yield: 12   |    Active Time: 20 minutes


Ingredients:

  • 6-ounces pitted Deglet Noor dates
  • 1/2 cup pecans
  • 1/2 cup unsweetened desiccated coconut
  • 1 tablespoon cinnamon
  • 1/2 teaspoon ground ginger
  • 1/2 teaspoon fresh ginger, grated on microplane
  • 1/2 teaspoon nutmeg
  • 1/4 teaspoon vanilla extract
  • 1/4 teaspoon ground cloves
  • Pinch of salt

  • Directions:

    1. Place all ingredients in a food processor and run until the a sticky crumb forms. Everything should stay together when pinched between two fingers.
    2. Roll mixture together by the tablespoonful to make a single bite. Place on a plate and repeat until all of the mixture is used.
    3. Store in an air-tight container in the fridge.