Greek Chicken Kabobs

Greek Chicken Kabobs

For the last two years, any time I’ve shot photos for blog posts I’ve done so by occupying this little 4 foot by 2-1/2 foot corner in the kitchen. It is wedged between the door to our garage, the side of a kitchen cabinet and the sliding glass door to the back yard. Other than completely blocking anyone access to the garage (or access to the house from the garage), the spot was perfect because it had good light between the hours of 8am and 3pm virtually all year ‘round, and it was conveniently located in the kitchen.

But then I started shooting videos. And oh did I learn so much! Natural light for photography is one thing — a beautiful thing - but you start shooting videos and suddenly you notice how the tiniest cloud can render one scene completely blueish. (EX: You can watch the colors of the background on this sheet pan fajitas video change throughout the whole scene. Yikes!).

So I dove in and purchased a set of “YouTuber” lights. So far I’m still learning how to use the ones I purchased (affiliate link). The light from the bulbs that came with them are a little pinker than I expected. BUT owning lights has opened up a whole new world for me — a world where I can shoot recipes outside of the hours of 9am and 3pm! And since I’m usually at work from 9-5pm, this is a BIG FREAKIN’ DEAL.

Remember that tiny corner of the kitchen I mentioned? Yes well, me and my three lights don’t fit there. At least, not with a plate of food, too. So, a few weeks ago, I made it my mission to take over our under-used office/spare bedroom and turn it into a studio. (!!!)

With the walls painted with a fresh coat of white and the closet rearranged to accommodate my photography gear, these Greek Chicken Kabobs were one of the first dishes to “test run” the new studio. All of this has given me a whole new level of motivation for house projects (I was running out of steam).

And now you’re thinking, OKAY WE GET IT but what about the kabobs?

Greek Chicken Kabobs

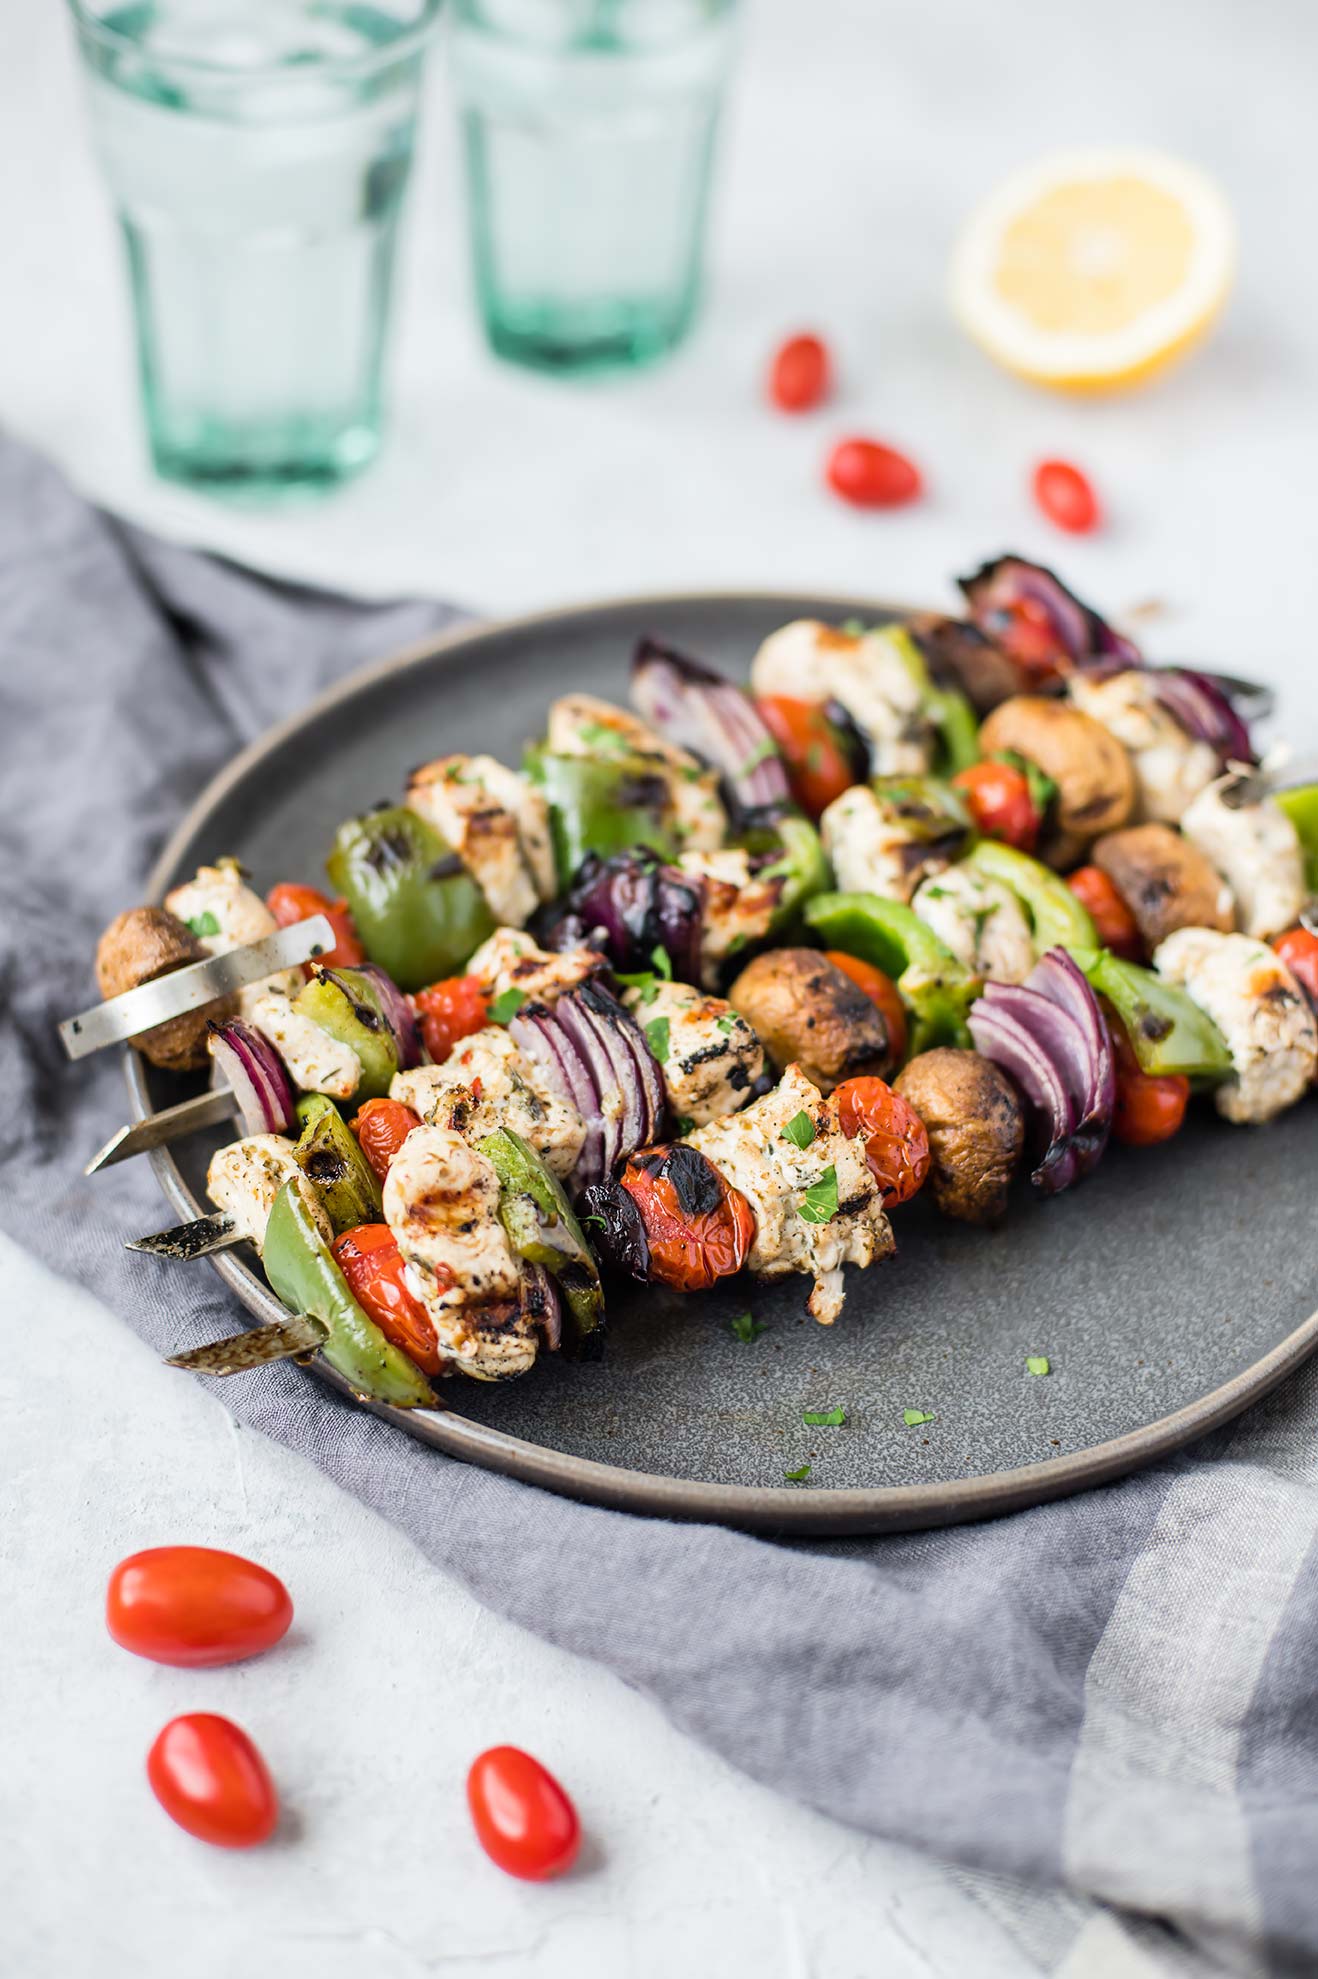
There are two ways to cook this mix of chicken and veggies in a lemon-oregano marinade: grilled, or baked.

Grilled, string everything onto skewers for kabobs. Roast on high until the juices run clear — about 12 minutes total, 6 on each side. You’ll get that fire-touched smokey flavor on the chicken and the onions and the tomatoes. This option is wonderful in the middle of summer, when you are out exploring (camping, at a park, at a potluck, etc), or when you just want to avoid turning on the oven.

Baked, you can skip the skewers and spread everything out on a sheet pan. Roast it all at 450°F for 15-20 minutes, until the chicken reaches an internal temperature of 165°F. On a sheet pan, the juices from the tomatoes, mushrooms, and chicken swirl together in the pan, creating a flavorful pan sauce. It makes the dish juicy which is delicious over rice. This version is best for weeknights or wintertime — when lighting the grill (or even going outside) is off the table.

In both versions, the chicken turns out super tender, thanks to the lemony marinade. That same marinade is what gives the whole dish it’s Greek-inspired flavor. They are a little spot of sunshine in the middle of a wintery week, but also perfect for summer grilling season (once that finally arrives!).

Greek Chicken Kabobs

Published January 29, 2018 by
   Print This Recipe

Serves: 6   |    Active Time: 30 minutes


Ingredients:

For the chicken:
  • Juice from 1 lemon
  • 2 tablespoons olive oil
  • 2 cloves of garlic, minced
  • 1 tablespoon dried oregano
  • 1 teaspoon dried thyme
  • 1/2 teaspoon dried rosemary
  • Sprinkle of red pepper flakes
  • 1/4 teaspoon salt
  • 1 pound chicken breast, cubed

  • For the kabobs:
  • 1 red onion, chopped into bite-sized pieces
  • 2 bell peppers, chopped into bite-sized pieces
  • 1 cup mushrooms (crimini, baby bella, or white)
  • 1 cup cherry tomatoes
  • 1/2 cup Kalamata olives
  • 1 tablespoon olive oil
  • Garnish: 2 tablespoons minced parsley

  • Directions:

    1. Marinate the chicken: in an airtight container, combine the lemon juice, olive oil, garlic, oregano, thyme, rosemary, red pepper flakes, and salt. Add chicken, and stir to combine. Close container and place in fridge for at least 4 hours (up to 24).
    2. For grilling: Light and preheat grill to high.
    3. For oven: Preheat oven to 450°F.
    4. Place chopped veggies and olives in a large bowl. Drizzle with olive oil, and stir so everything is coated.
    5. Assemble kabobs: Working with one kabob stick at a time, skewer chicken, vegetables and olives in an alternating pattern. (If you plan to roast in the oven, you can skip this step, and simply spread everything out on a sheet pan).
    6. For grilling: Place kabobs on preheated grill and reduce heat to medium-high. Grill, with the lid closed, for 6 minutes, and then turn kabobs and grill on second side for another 6 minutes. Juices should run clear and chicken should reach an internal temperature of 165°F. Remove from grill and serve hot over a bed of rice. Garnish with parsley. For oven: Place sheet pan in pre-heated oven and roast for 15-20 minutes, until chicken reaches an internal temperature of 165°F. Remove from oven and use a spatula to serve over rice. Spoon juices from pan over top. Garnish with parsley.

    Comment

    Red Curry Noodle Bowl with Shrimp & Broccoli

    Red Curry Noodle Bowl with Shrimp & Broccoli

    Happy 2019! 🎉

    What are your goals this year? Any New Year Resolutions?

    I haven’t written any down, but after the holidays I am looking for some healthy meals to tuck into. (After all that Eggnog, thumbprint cookies, and pie — oh my!)

    Plus, when the days are short and it’s dark before I leave work, there’s nothing like a colorful, warm dinner to brighten things up. Red Curry Noodle Bowls are exactly that.

    Rice noodles cook in 5 minutes flat — a big advantage if you’re rushing to get dinner together after the gym or a long day! In fact, if you’re really in a rush, and you’re good at planning (eh-em — not me), you can make the coconut curry broth ahead of time, and then dinner will be on the table in 10 minutes! 

    Red Curry Noodle Bowl with Shrimp & Broccoli
    Red Curry Noodle Bowl with Shrimp & Broccoli

    Other than being 1) super delicious and 2) super cozy on a cold January day, this bowl has it all: complex carbohydrates, protein, fat (specifically, medium chain saturated fatty acids), and fiber. Plus: Vitamin C, folate, omega-6 and omega-3s, and essential minerals.

    Thai Curry is usually served over rice, but sometimes you just want to mix it up! Rice noodles are slurpy, delicious, and a perfect match for curry flavors. (Besides, see above comment about cooking time… they cook faster than rice, which takes closer to 18 minutes.)

    To store leftovers, I put cooked rice noodles in one pyrex dish and the broth and veggies in another. I’ve found that some brands of rice noodles will continue to soak up any broth or sauce after they’re cooked, so when you store them together the noodles get a little too soft for my taste. Keep them separate until it’s time to eat and you’re golden! (Sort of like ramen — add the noodles last!)

    Red Curry Noodle Bowl with Shrimp & Broccoli
    Red Curry Noodle Bowl with Shrimp & Broccoli

    Red Curry Noodle Bowl with Shrimp & Broccoli

    Published January 1, 2018 by
       Print This Recipe

    Serves: 4   |    Active Time: 20 minutes


    Ingredients:


    For the red curry coconut broth:
  • 1 shallot, minced
  • 1 teaspoon coconut oil
  • 1 13.5-ounce can full-fat coconut milk
  • ¼ cup chicken broth
  • 4 tablespoons red curry paste
  • 1 tablespoon lime juice
  • 1 teaspoon maple syrup
  • Dash of fish sauce (optional)

  • For the shrimp & veggies:
  • 1 tablespoon coconut oil
  • 1 cup shrimp, raw, shelled & deveined
  • 2 cups broccoli florets
  • ½ cup sliced mushrooms

  • For serving: 
  • Brown rice noodles
  • 2 tablespoons scallions, sliced
  • Sesame seeds
  • Lime wedges
  • Hot sauce, such as sriracha

  • Directions:

    1. Make the sauce: Heat 1 teaspoon coconut oil in a sauce pan, and add minced shallot. Sauté until shallots are soft. Add coconut milk, broth, curry paste, lime juice, maple syrup, and a small dash of fish sauce (optional). Bring to a simmer, and stir until everything is well mixed.
    2. Sauté shrimp in veggies: Heat coconut oil in a large skillet or wok over high heat. Add shrimp and cook 2-3 minutes or until pink (about 1 minute on each side). Move shrimp to a plate, and reduce heat to medium. Add mushrooms to pan, and cook about 2 minutes, and then add broccoli. Cook for 3 mote minutes, stirring every minute or so — broccoli should be bright green and mushrooms should be soft.
    3. Cook noodles according to package. I used Lotus Foods Brown Rice Noodles (affiliate link!), and boiled them in hot water for 5 minutes, and then strained them.
    4. Serve: Divide rice noodles between 4 bowls. Ladle coconut curry broth over top, and then use a spatula to divide shrimp and veggies between each. Top with sliced scallions, sesame seeds, lime wedges, and hot sauce to taste.

    1 Comment

    Slow Cooker Mole Chicken Tacos

    Slow Cooker Mole Chicken Tacos

    There is a lot of folk lore surrounding the creation of mole poblano — the chocolate chili sauce Mexico is so known for.

    One theory is that a convent of nuns invented mole for an archbishop in an effort to impress him, when no other ingredients could be found. Another story says that it was all a mistake, that a monk (rather than a nun) first made the dish for the archbishop when he accidentally knocked several stray spices into the pot. Either way, both versions tie the sauce back to over 300 years ago!

    It’s no wonder there is so much speculation over the dish’s origins… mole sauce recipes typically call for a hefty list of seemingly random ingredients. But that’s part of the magic: it may not strike you that raisins and tomatoes and chili powder and cocoa will blend well together, but sure enough, the result is stellar. Spicy, tangy, with a rich backdrop, thanks to the chocolate.

    Slow Cooker Mole Chicken Tacos
    Slow Cooker Mole Chicken Tacos

    Something else stays consistent across almost every origin story, and that’s that mole is for special occasions. My dad will slave over a batch of mole for Christmas dinner; and me? I usually save it for a day when I know I can sit down and really take the time to enjoy the meal.

    Such a complex sauce does not need many frills. Simmer some chicken (or turkey, or pork, or black beans, or whatever you have) until tender, and then serve simply. All you need for a fancy taco is a corn tortilla, some chicken in mole sauce and a sprinkle of cilantro. A few thin slices of red onion certainly brighten it up, and why not — a few pepitas on top for crunch (you have them out from making the sauce, anyhow). Now, this isn’t the traditional way to serve mole, which is over a bed of rice, but it’s easy nonetheless, and everything is delicious as a taco.

    Slow Cooker Mole Chicken Tacos

    Slow Cooker Mole Chicken Tacos

    Published December 18, 2018 by
       Print This Recipe

    Serves: 6-8   |    Active Time: 60 active minutes


    Ingredients:

  • 2 pounds boneless skinless chicken (breasts or thighs)
  • 1 white onion, diced
  • 2 cloves garlic, minced
  • 1 tablespoon coconut oil
  • 2 tablespoons cocoa powder
  • 2 tablespoons ancho chili powder
  • 2 chipotle chile peppers in adobo sauce, plus 1 teaspoon of the adobo sauce from the can (find canned chipotles in adobo in the Mexican section of your grocery store. Most canned have quite a few peppers, use a spoon to scoop out two)
  • 1 16-oz can of diced tomatoes
  • 1/8 teaspoon ground cumin
  • 1/8 teaspoon ground coriander
  • 1/8 teaspoon ground anise
  • 1/4 teaspoon ground black pepper
  • 1/2 teaspoon salt
  • Pinch ground cloves
  • 1/4 cup pepitas, plus more for garnish
  • 2 tablespoons sesame seeds
  • 2 tablespoons raisins
  • 1 cinnamon stick (about 2-3 inches long)
  • For serving: corn tortillas, cilantro, finely sliced red onion

  • Directions:

    1. In a skillet, or the bottom of you Instant Pot/Slow Cooker (set to the Sauté setting), heat coconut oil and sauté onion and garlic until onion is transparent. Turn off heat once onions are cooked.
    2. Transfer the onion mixture to a blender, and add cocoa, chili powder, chipotles and adobo sauce, canned tomatoes, cumin, coriander, anise, black pepper, salt, ground cloves, pepitas, sesame seeds, and raisins. Place lid on blender and purée until smooth.
    3. Place chicken in the bottom of your Instant Pot/Slow Cooker. Pour sauce over top, and add cinnamon stick. Place lid on pot and set to slow cook on “medium” for 6 hours or “high” for 4 hours.
    4. When timer goes off, cut chicken into bite-sized pieces (should fall apart easily) and serve in warm tortillas topped with fresh cilantro, red onion, and pepitas.

    2 Comments