Rainbow Soba Noodle Bowls

Rainbow Soba Noodle Bowls

You would think, with the full day spent at home, I would feel like I have plenty of time to spare now. But somehow, that’s not the case. When I think about my time two months ago, I find myself wondering how I did it all—schlepping from one place to the next. We have been staying busy, mostly with house projects, which has likely benefited my sanity.

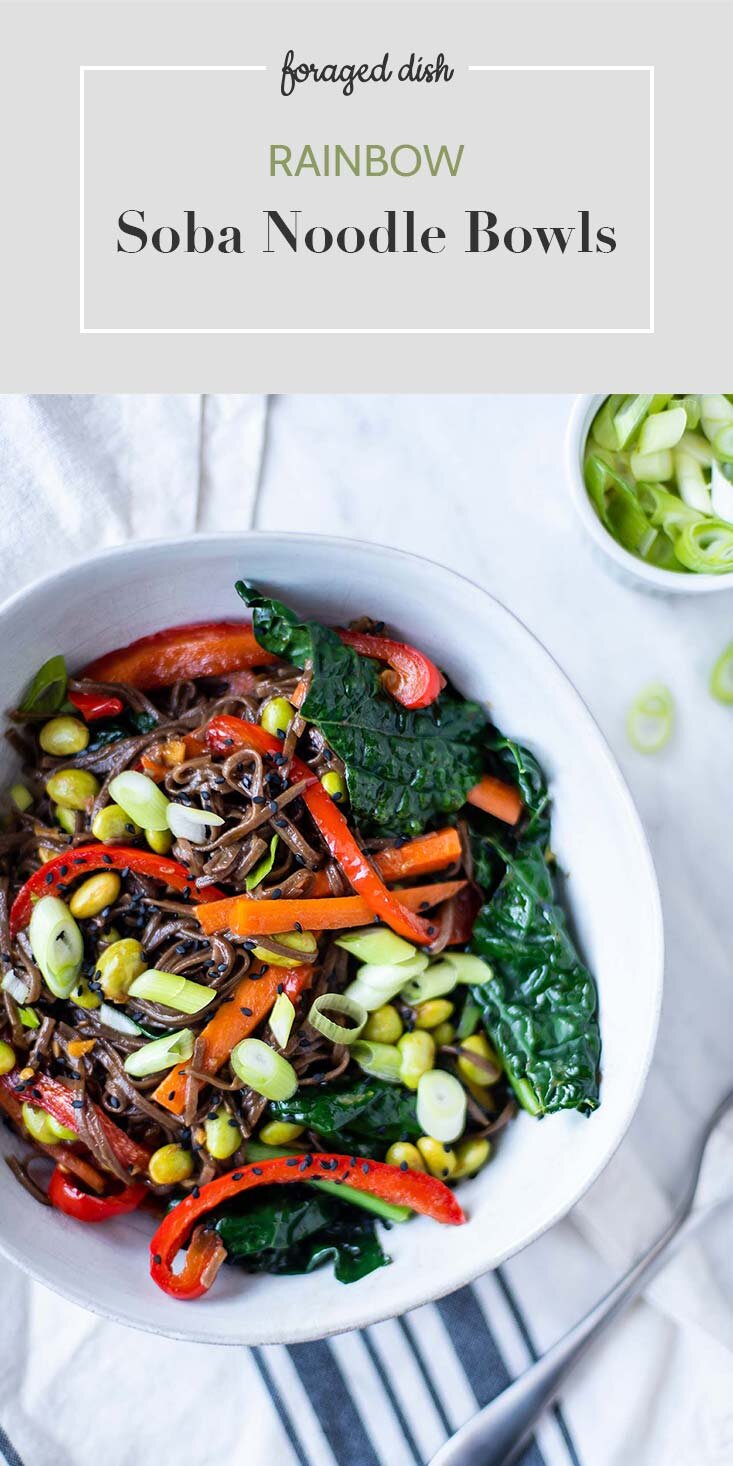
Stir fry is a go-to for me when I need dinner fast, and stir fry doesn’t have to be served over rice. This dish is essentially a stir fry, but soba noodles transform it into something different. Quick and easy—but also full of colorful veggies—this has been a regular lately. Like most stir fries I make, this one is cooked with soy sauce, rice wine, and sambal oelek (that chili garlic paste you’ll find in the ethnic food isle in the grocery store). It’s a salty-acidic-spicy sauce combination that isn’t just limited to this recipe: use it any time you’re sautéing veggies and want a little extra punch.

Rainbow Soba Noodle Bowls

Rainbow Soba Noodle Bowls

Published April 30, 2020 by
   Print This Recipe

Serves: 4   |    Active Time: 30 minutes


Ingredients:

  • 1/2 package soba noodles
  • 1 tablespoon coconut oil
  • 1 zucchini, roughly chopped
  • 1 red bell pepper, sliced into strips
  • 2 large carrots, sliced into matchsticks
  • 2 cloves garlic, minced
  • 1 inch ginger, minced
  • 1 1/2 cup shelled fresh or frozen shelled soy beans (mukimame)
  • 4-5 leaves dino (or lacinato) kale, roughly chopped
  • 1/4 cup soy sauce
  • 1 tablespoon cooking rice wine
  • 2 tablespoon rice vinegar
  • 1/4 teaspoon cornstarch
  • 1 tablespoon sambal oelek (chili garlic sauce)
  • 1 green onion, sliced for garnish
  • 2 tablespoons sesame seeds, for garnish

  • Directions:

    1. Cook soba noodles according to instructions on package. When noodles are al dente, strain through a colander and set aside.
    2. While noodles cook, sauté vegetables: heat coconut oil over medium-high heat in a large skillet or wok. When oil glistens, add zucchini, bell pepper, carrots, ginger, and garlic, and sauté until zucchini just starts to turn become tender. Add soy beans.
    3. In a jar, combine soy sauce, cooking rice wine, cornstarch, and samba olek. Shake or whisk to combine.
    4. Pour half of sauce into skillet, and allow sauce to bubble for a few minutes. Sauce will begin to thicken.
    5. Add cooked noodles to the pan, along with chopped kale. Using tongs, mix everything to incorporate the vegetables into the noodles.
    6. Add remaining sauce to pan, and cook for 3-5 more minutes, staring occasionally to ensure everything is coated in sauce. Remove from heat, and garnish with green onions and sesame seeds. Serve.

    Comment

    Chicken Piccata with Picholine Olives

    Today, I’m sharing an update to a a recipe that’s been on the blog for quite a while (since 2014!). This updated version still calls for olives, which is not a typical Piccata ingredient, but if you ask me, olives are rarely a bad idea.

    When I think of chicken piccata, I don’t think of anything too bold or fancy. It evokes mental images of chain-style Italian restaurants. But that’s not quite right, because fresh home-style chicken piccata is bright. It’s surprising what a single lemon can do, and how briny capers awaken any dish. Bring an old classic back to the table—why not? Classics are classics for a reason, and this one is ready in under 30 minutes.

    Chicken Piccata with Picholine Olives

    Chicken Piccata with Picholine Olives

    Published April 21, 2020 by
       Print This Recipe

    Serves: 4   |    Active Time: 25 minutes


    Ingredients:

  • 1 pound chicken cutlets or chicken tenderloins
  • Salt
  • Black pepper
  • 1/3 cup all purpose flour
  • 2 tablespoons olive oil
  • 1 clove garlic, minced
  • 1 lemon, plus additional slices for garnish
  • 1/2 cup chicken broth
  • 3 tablespoons capers
  • 1/2 cup pitted picholine olives or castelvetrano olives
  • 1/4 cup minced parsley for garnish

  • Directions:

    1. Sprinkle chicken, on both sides, with salt and pepper.
    2. Put flour on a plate. Coat each piece of chicken in the flour, shaking off excess.
    3. Heat olive oil in a pan over medium-high heat. When oil is glistening, place chicken in pan. Allow to cook for 3-4 minutes, undisturbed. Chicken should be white around the edges and golden on the cooked side. Add garlic to pan. Flip chicken to second side, and cook for 3 more minutes or until golden.
    4. Using a spatula or tongs, transfer chicken to a clean plate. Pour broth into pan, and reduce heat to medium-low. Squeeze lemon juice into pan. Using spatula, scrape the bottom of the pan, scraping up the brown bits for added flavor.
    5. Add chicken back to pan, and coat in sauce. Add capers and olives.
    6. Serve chicken on plates, and sprinkle with parsley.

    4 Comments

    Parma Rosa Chicken

    Parma Rosa Chicken

    Some kids go through a mac 'n' cheese phase (it's something they can cook themselves), and some kids go through a cereal phase (doesn't require cooking at all). Me? Knorr Instant Parma Rosa Sauce was a childhood fave. It’s embarrassing but true.

    To this day, I'm not sure what is even in those packs of instant pasta sauce. And frankly? I don't want to know. What I do know is that it's addicting. Back then I called it "pink sauce." 

    Even though I ate many (many!) packets of pink sauce as a kid, it's not what I was thinking about when I started working on this recipe. Nope, I just thought I was making a creamy chicken parmesan. It wasn't until my first bite that my memory sprang into action: 

    I know this flavor! This tastes like pink sauce! 

    What was that called? Parma Rosa, a Google search told me.

    Parma Rosa Chicken
    Parma Rosa Chicken

    And it does taste just like Parma Rosa -- a bigger, bolder, fresher, real parma rosa. A grown up pink sauce. And instead of a soft creamy pink color, it's a rich creamy orange-red, evidence of real tomatoes in there. 

    You can eat this dish as-is (that's what I did, with a side salad), or you could serve it over pasta. It goes great with a glass of white wine, and the leftovers are just as good the next day. 

    Between this recipe and this lasagna, I've been on quite the Italian kick lately! (Is pink sauce Italian? I don't think so, but it seems Italian). 

    Parma Rosa Chicken

    Parma Rosa Chicken

    Published July 26, 2018 by
       Print This Recipe

    Serves: 4   |    Active Time: 30 minutes


    Ingredients:

  • 4 small chicken breasts (or 2 large cut in half)
  • 1-2 tablespoons coconut oil
  • 1/2 yellow onion, finely diced
  • 2 garlic cloves, minced
  • 16 ounce can tomato sauce (Note: this is in the canned tomato aisle; it is puréed tomato -- not a pre-made pizza or pasta sauce, which will already have herbs, garlic, etc)
  • 1/4 teaspoon dried thyme
  • 1/2 teaspoon fresh rosemary, minced
  • 1 tablespoon fresh basil, minced, plus more for garnish
  • 3/4 cup half-and-half
  • 1/2 cup grated parmesan

  • Directions:

    1. Heat 1 tablespoon oil in a 10-inch oven-safe skillet over medium-high heat. When the oil glistens, place the chicken in the skillet. Cook on each side for 5 minutes, until browned. Move to a plate and set aside.
    2. If pan is dry, add additional tablespoon of coconut oil. Add onions and garlic, and sauté until transparent. Reduce heat to low. Pour in tomato sauce and stir.
    3. Add thyme, rosemary, and basil to sauce, and then stir in the cream. Place chicken back in pan, immersing it in the sauce. Allow sauce to simmer lightly for 1-2 minutes, and then top each piece of chicken with parmesan. Place skillet in oven and turn to broil. Allow to cook for about 5 minutes — until cheese is bubbling. Remove from oven, top with additional basil for garnish, and serve hot.

    Comment