Balsamic Fig Glazed Chicken

Balsamic Fig Glazed Chicken

This recipe was originally published to the blog in 2016. I’m giving the post an update. The sauce for this recipe is sweet and tangy. You can make this any time of year using fig jam, but I like making it in fall, when I start craving richer meals.

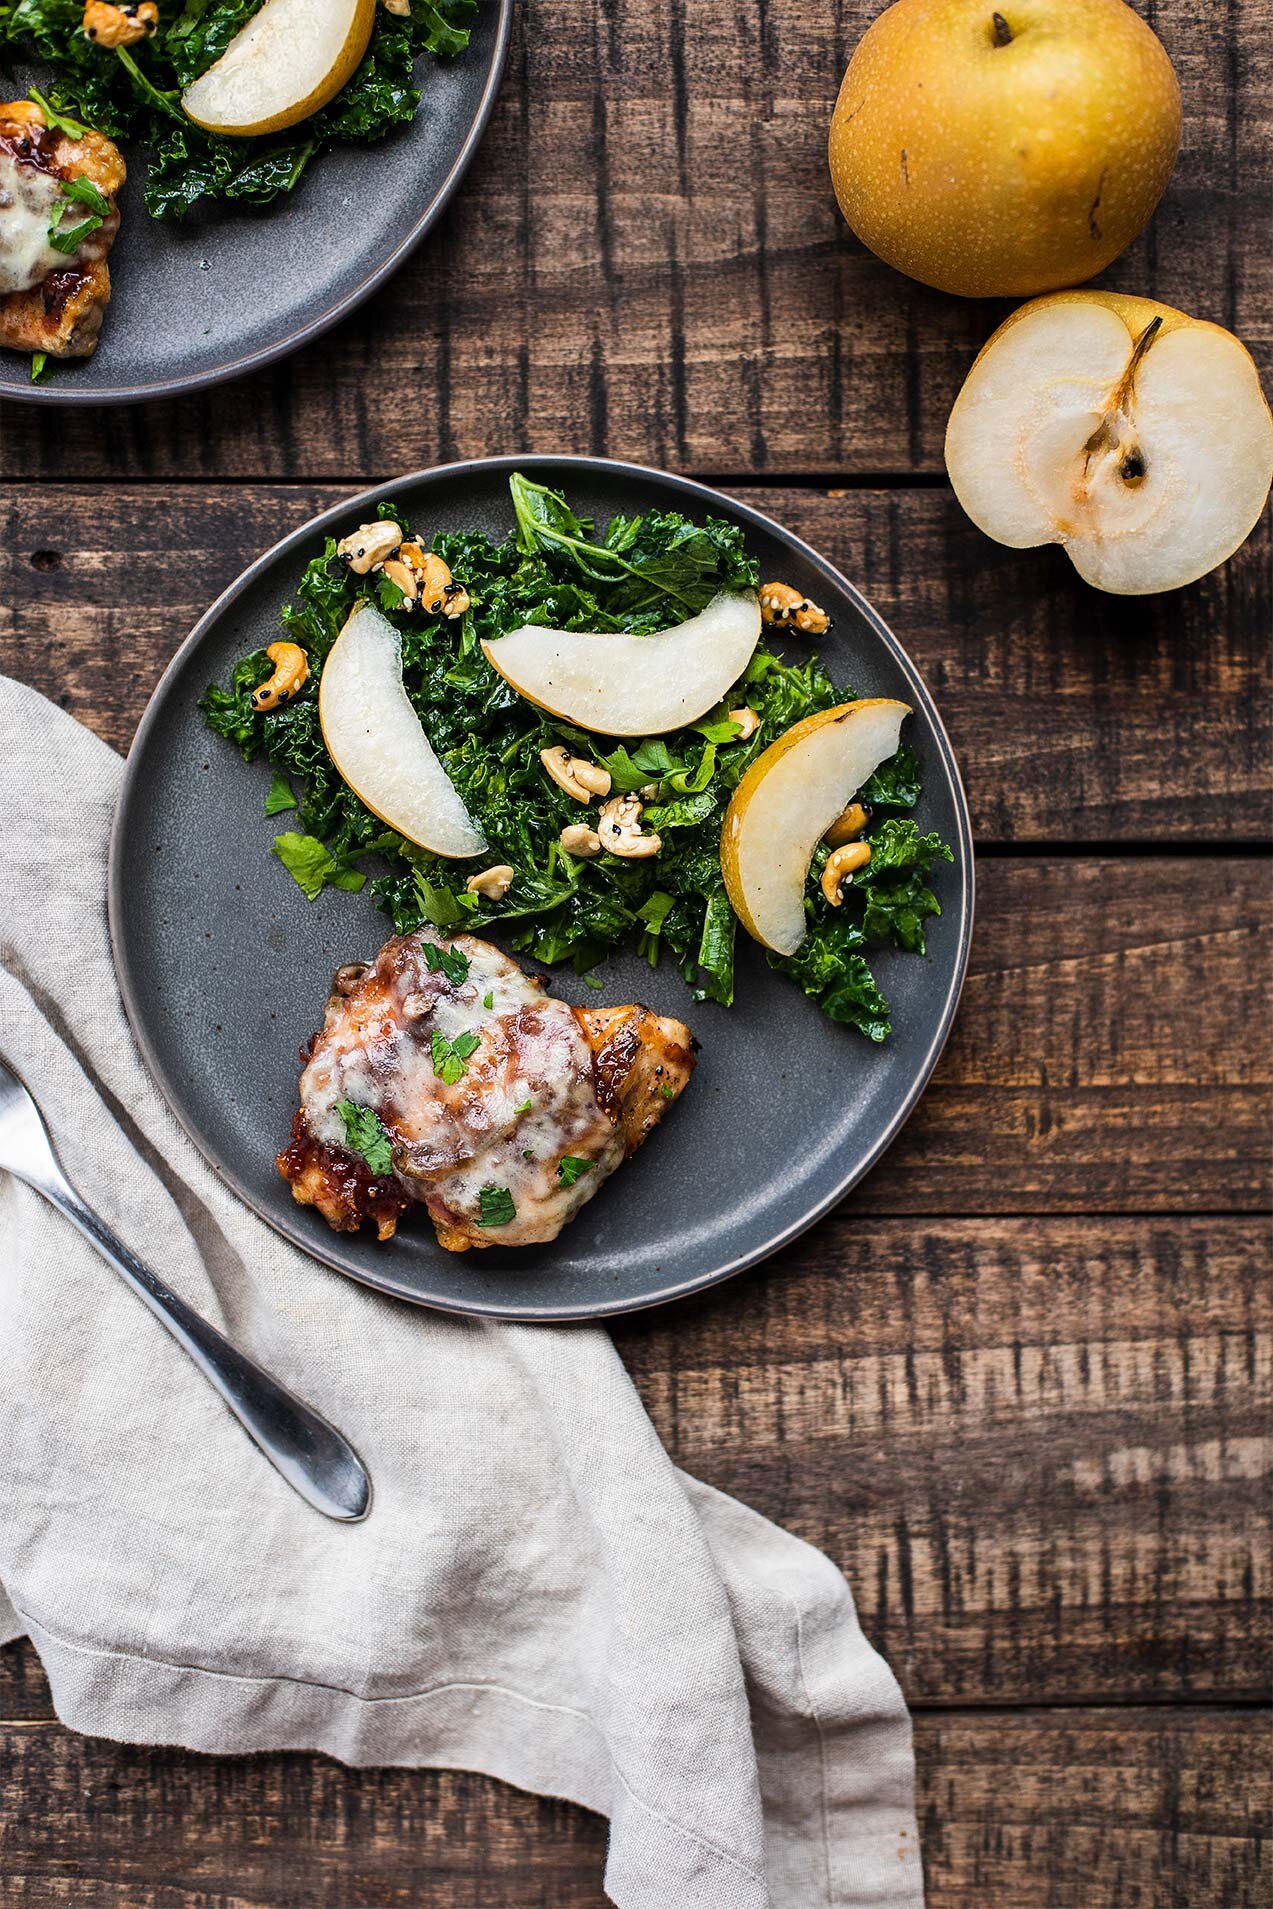
You never know where inspiration will find you, and this recipe is proof: some years ago, on a road trip, we stopped at a grocery store for a quick meal. I ended up ordering balsamic fig-glazed chicken from the deli counter. My expectations of the deli counter meal were low, so imagine my surprise when I took the first bite and found the glaze to be complex and full of flavor. This make-it-at-home version is far better than that deli version, a perfect dish for a dinner party on a crisp fall evening. Serve with a spicy red wine and this salad from Saveur (I use Asian Pears rather than apples for extra crunch).

Balsamic Fig Glazed Chicken

Balsamic Fig Glazed Chicken

Published October 6, 2020 by
   Print This Recipe

Serves: 4   |    Active Time: 60 minutes


Ingredients:

  • 1 pound boneless, skinless chicken thighs (Breasts also work, but I prefer thighs because they tend to stay juicier; Chicken breasts tend to take longer to cook, so adjust accordingly)
  • 2 tablespoons butter (or coconut oil)
  • 1 medium-sized shallot
  • 2 cloves garlic
  • 1/4 cup red wine
  • 1/4 cup fig jam
  • 1 tablespoon balsamic vinegar
  • Salt & pepper
  • 4-6 slices of Provolone cheese

  • Directions:

    1. Start the sauce: Mince shallots and garlic. Heat 1 tablespoon butter in saucepan. When butter is sizzling, add shallots and garlic. Sprinkle with a generous pinch of salt, and sauté until shallots are translucent and starting to brown.
    2. Pour 1/4 cup red wine into sauce pan. Bring to simmer. Cook for 5-6 minutes, until liquid has reduced by about half. Add 1/4 cup fig jam and 1 tablespoon balsamic vinegar, and stir to incorporate. Simmer sauce, stirring frequently, until the sauce has thickened enough to coat the back of a spoon. Remove from heat and set aside.
    3. Season chicken generously with salt. Cook the chicken: heat remaining 1 tablespoon butter in a skillet over medium heat. When butter is sizzling, place chicken in pan. Cook on one side, without moving, for 5-6 minutes, or until chicken easily releases from the pan (if chicken sticks, it likely needs to cook a bit longer). Spoon about half of the fig sauce over the cooked side of the chicken, and continue to cook on the second side for 5 more minutes, or until and internal temperature of chicken reaches 165°F. Spoon remaining fig sauce over chicken, and top each piece with a slice of provolone. Place lid on pan, and cook for 1-2 more minutes, until cheese is melted.
    4. Transfer to serving plates, and season to taste with freshly cracked black pepper.
    5. Note: You can also grill the chicken if that’s more your style. The cheese will melt very quickly if you go this route, so watch closely.

    8 Comments

    Goat Cheese & Chive Scrambled Eggs

    Goat Cheese & Chive Scrambled Eggs

    Adding goat cheese crumbles to scrambled eggs takes about two additional seconds but adds so much creamy cheesy flavor.

    While I normally opt for eggs over easy these days, scrambled eggs were probably the first thing I ever learned to cook myself, and that alone made them one of my favorite foods as a kid. (I would scramble and egg in the microwave on slow weekends when my mom would ask, “Are you going to eat breakfast today?")

    That version didn’t call for goat cheese (and I don’t think twenty-years-ago Caitlin would’ve appreciated the addition), but goat cheese adds pockets of creaminess that are out of this world.

    Goat Cheese & Chive Scrambled Eggs
    Goat Cheese & Chive Scrambled Eggs

    Chives and goat cheese are a classic combo. Chives add a delicate onion-garlic flavor that is just zippy enough to give creamy goat cheese some extra life. Chives are one of the first plants in the garden that turns green come spring, making this breakfast a perfect early spring kind of dish.

    I happened to also be cooking up a batch of creamy Icelandic Langoustine Soup, and had some extra chives to burn. I hate buying a bunch of herbs and only using half, leaving the other half to wither in the fridge… though, that ends up being the fate of many MANY bunches of herbs in our fridge. Sound familiar? Well, there are LOTS of ways to use up chives, including this recipe! Here are a few more to help you finish off that bunch: Crustless Quiche Lorraine (a reader fave!), Sweet Potato Chive Hash Brown Waffles, or Garlic and Herb Shrimp with Vine Ripe Tomatoes. You could basically build a whole week’s meal plan around a bunch of chives!

    We served these eggs with a side of roasted sweet potatoes, but sautéd veggies would also be delish!

    Goat Cheese & Chive Scrambled Eggs
    Goat Cheese & Chive Scrambled Eggs

    Watch now: Goat Cheese & Chive Scrambled Eggs

    Goat Cheese & Chive Scrambled Eggs

    Published January 17, 2018 by
       Print This Recipe

    Serves: 2   |    Active Time: 20 minutes


    Ingredients:

  • 4 eggs
  • 3 tablespoons goat cheese crumbles, plus more for topping
  • 1/8 teaspoon salt
  • 1/8 teaspoon ground black pepper, plus more for topping to taste
  • 1 tablespoon cooking oil, such as coconut or avocado
  • 2 tablespoons minced chives, plus more for garnish 

  • Directions:

    1. Crack all four eggs into a mixing bowl. Whisk together until they are frothy and solid yellow. Add goat cheese, salt, and pepper, and whisk to incorporate.
    2. Heat oil in a 10-inch skillet over medium heat. Pour egg mixture into skillet. As eggs begin to set (after a few minutes) gently use a spatula to pull eggs across pan, making curds. Add in chives and continue to cook for a few more minutes, occasionally stirring, until all of the egg mixture is set.
    3. Divide among serving plates and sprinkle with extra goat cheese and chives, along with extra black pepper to taste.

    Comment

    Chocolate Chip Energy Bites (With Video)

    This is an older recipe from Foraged Dish that I wanted to spruce up with new photos and a video. These energy bites are so darn delicious — they’ve been in my snack draw at work and I SO look forward to snack time each day! 

    Chocolate Chip Energy Bites

    Last week I went on a hike in the Front Range with nothing in my bag but my camera, my phone, and a ziplock stocked with these Chocolate Chip Energy Bites. I thought I had my car key too, until 30 minutes in when — oh no! - I noticed the pocket where I keep my key was open. Open and empty. 

    I immediately turned on my heels and spent the whole hike downhill with my head turned down, eyes constantly scanning the trail. I tried to soothe my inner chatter box, which, by the time I made it back down to the trailhead with no sign of my keys in sight, was freaking out.  In the end, I had to call for a ride to go get a spare key (thanks, Dad!). 

    But I digress. Casualties of hiking alone are not what this post is about! This post is about the snack I had with me at the time, Chocolate Chip Energy Bites! (The whole hike I kept thinking, well at least if I have to wait a while, I have good snacks…)

    Chocolate Chip Energy Bites
    Chocolate Chip Energy Bites

    These energy bites call for only six ingredients and they just go into your food processor and you roll them up. That’s it!  Why macadamias and cashews? Macadamia nuts are extra buttery, which lends very well to this recipe, which taste a lot like a healthy version of cookie dough! At the same time, cashews are a bit starchier than most nuts, and their sweet flavor also gives these bites a bit of a “cookie dough” flavor. 

    Mini chocolate chips are best in this recipe because they distribute into each energy bite well. Each bite has a bit of chocolate and a bit of nut mixture, which sticks everything together. 

    Happy hiking! Take these with you — and don’t lose track of those keys!! 

    Chocolate Chip Energy Bites

    Published January 15, 2018 by
       Print This Recipe

    Yield: 12   |    Active Time: 20 minutes


    Ingredients:

  • 1/3 cup dates, pitted
  • 1/2 cup macadamia nuts
  • 1/2 cup cashew pieces
  • Pinch of salt
  • 1 tablespoon honey
  • 3 tablespoons mini chocolate chips

  • Directions:

    1. Add dates, macadamia nuts, cashews, salt, and honey to bowl of food processor. Secure lid on food processor and run until the nuts are ground into a corse meal that begins to clump.
    2. Add mini chocolate chips to food processor and pulse, 2-3 times, just until chocolate is evenly distributed.
    3. Scoop a heaping tablespoonful of the mixture into your hands and roll into a ball. Repeat until all of the mixture is used.
    4. Enjoy immediately or store in an air-tight container in the fridge.

    Comment